

Quick VMs with QEMU
IMPORTANT As far as I know this information is still accurate but it is old now. I recommend that this only be used as reference. See other pages that use UEFI booting. /IMPORTANT
This is a simple article on how to make vms quickly with QEMU. This is what we use at work to host all our VMs. This quick reference shows you how to do this with Windows 7 64bit (and virtio drivers) but you can do the same with other OSs. One note is that I have not had much luck with the Windows XP block virtio drivers... not that I have much use for Windows these days anyway ;-).
Create the VM image
qemu-img create -f qcow2 win764vm.img 500G
Boot the system with the non-virtio block drivers
The following command is actually all on the same line, in bash (and
some other shells) the \ means ignore the \n
and assume that this is all one line. Don't put
anything except a new line after the \ it is an escape
caracter, just like in a C or Java string.
qemu-system-x86_64 -enable-kvm -m 2048 -k en-gb \
 -cdrom windows7_64bit.iso -hda win764vm.img \
 -boot d \
 -net nic,model=virtio,macaddr=00:00:D1:C0:54:39 \
 -net tap,ifname=tap5,script=no,downscript=no
I will leave you to install Windows... and even the network device drivers. Available from Fedora, if you have problems with that link look at KVM website. Don't worry about the block drivers, I will cover those in a moment.
Next, create a new drive and set the configuration to the below:
qemu-system-x86_64 -enable-kvm \
        -k en-gb \
        -m 2048 \
        -net nic,model=virtio,macaddr=52:54:00:12:34:56 \
        -net tap,ifname=tap5,script=no,downscript=no \
        -hda win764vm.img \
        -drive file=tempvio.img,if=none,id=drive-virtio0 \
        -device virtio-blk-pci,drive=drive-virtio0,id=virtio-blk-pci0 \
        -boot c \
        -monitor tcp:127.0.0.1:5925,server,nowait \
        -qmp tcp:127.0.0.1:5945,server,nowait \
        -cdrom virtio-win-0.1-30.iso
virtio-win-0.1-30.iso is the driver image you downloaded
from Fedora/RedHat.
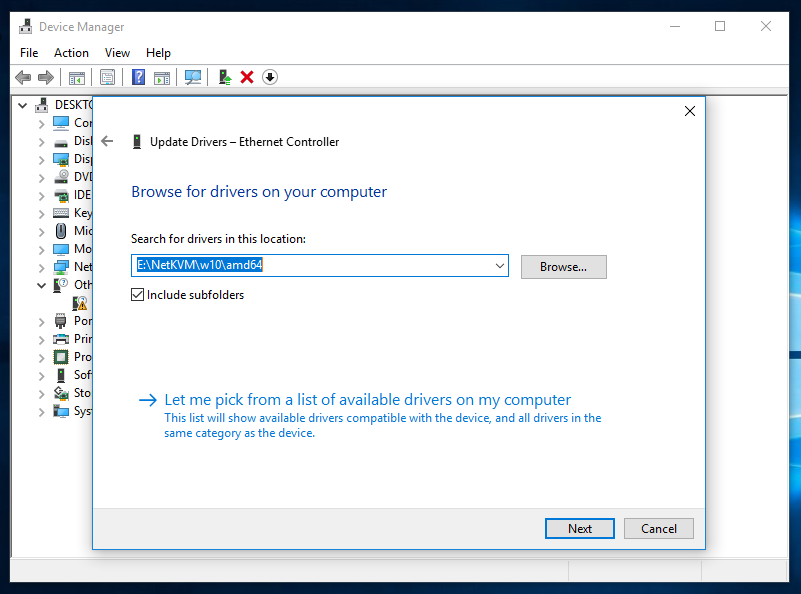
In windows you should now be able to see SCSI controller and Ethernet Controller in device manager... picture to follow.
More pictres
When you have finished, Shutdown the machine and change your script... again!
qemu-system-x86_64 -enable-kvm \
        -k en-gb \
        -m 2048 \
        -net nic,model=virtio,macaddr=52:54:00:12:34:56 \
        -net tap,ifname=tap5,script=no,downscript=no \
        -drive file=win764vm.img,if=none,id=drive-virtio0 \
        -device virtio-blk-pci,drive=drive-virtio0,id=virtio-blk-pci0 \
        -monitor tcp:127.0.0.1:5925,server,nowait \
        -qmp tcp:127.0.0.1:5945,server,nowait
Needs improving!
Replace a CDROM/DVD in QEMU Command Line (monitor)
(qemu) info block
info block
hd (#block136): root.raw (raw)
    Attached to:      /machine/peripheral-anon/device[0]
    Cache mode:       writeback

cd (#block315): ../ISOs/install-amd64-minimal-20180405T214502Z.iso (raw, read-only)
    Attached to:      /machine/peripheral-anon/device[1]
    Removable device: locked, tray closed
    Cache mode:       writeback

ide2-cd0 (#block576): ../ISOs/install-amd64-minimal-20180405T214502Z.iso (raw, read-only)
    Attached to:      /machine/unattached/device[20]
    Removable device: locked, tray closed
    Cache mode:       writeback

sd0: [not inserted]
    Removable device: not locked, tray closed
In the guest, eject the cdrom drive (eject /dev/sr0)
(qemu) info block
info block
hd (#block136): root.raw (raw)
    Attached to:      /machine/peripheral-anon/device[0]
    Cache mode:       writeback

cd (#block315): ../ISOs/install-amd64-minimal-20180405T214502Z.iso (raw, read-only)
    Attached to:      /machine/peripheral-anon/device[1]
    Removable device: not locked, tray open
    Cache mode:       writeback

ide2-cd0 (#block576): ../ISOs/install-amd64-minimal-20180405T214502Z.iso (raw, read-only)
    Attached to:      /machine/unattached/device[20]
    Removable device: not locked, tray open
    Cache mode:       writeback

sd0: [not inserted]
    Removable device: not locked, tray closed
Now eject the device from the qemu command line
(qemu) eject ide2-cd0
and/or
(qemu) eject cd
To insert a new disk:
(qemu) change ide2-cd0 ../ISOs/alpine-standard-3.9.4-x86_64.iso
...or use a full path.
linux-kvm.org | stackoverflow.com
Extending a QCOW2 Disk
To extend a qemu qcow2 disk, do this:qemu-img resize virtualdisc.qcow2 300G
Installing Windows 10
Quick, Simple and No Cortana...
qemu-system-x86_64 -name Win10Dev \
	-accel kvm \
	-k en-gb \
	-m 4096 \
	-cpu host,hv_relaxed,hv_vapic,hv_time,hv_spinlocks=0x1fff \
	-machine pc-q35-2.11 \
	-smp 2 \
	-rtc base=localtime \
	-vnc :40 \
	-net nic,model=virtio,macaddr=02:9a:e5:66:ea:70 \
	-net tap,ifname=tap40,script=no,downscript=no \
	-drive file=root.qcow2,format=qcow2,if=none,id=drive-virtio0 \
	-device virtio-blk-pci,drive=drive=virtio0,id=virtio-blk-pci0 \
	-drive file=../ISOs/windows10-x68_64.iso,media=cdrom \
	drive file=../ISOs/virtio-win-0.1.164-r2.iso,media=cdrom
Bridge the VM to the ethernet network. This assumes that br0 is
correctly set-up to forward ethernet frames to eth0 (or whatever
interface is relevent):
ip tuntap add tap40 mode tap
ip link set down dev tap40
brctl addif br0 tap40
ip link set up dev tap40
Once the clean install is ready there are a number of steps to be performed:
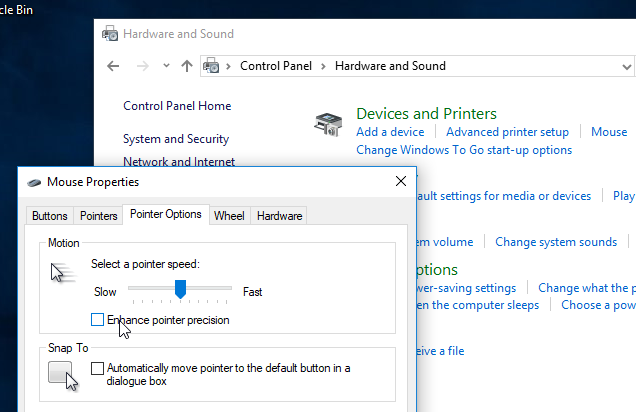
- Turn off "Enhance pointer percision"
- Remove Cortana
- Remove OneDrive
- Remove Tiles
Turn off "Enhance pointer precision"
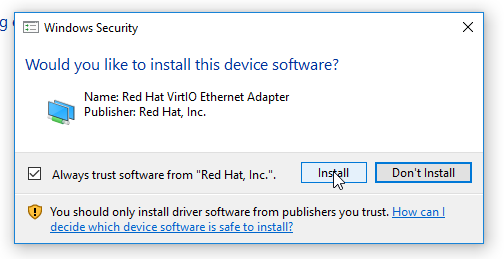
Install Network Adapter Drivers
Remove Cortana
There are many suggestions of how to remove Cortana in Windows 10 the best I found is a combination of a little programme and a batch file from winaero.com (copy locally).
Removing Cortana does "break" Windows 10 Search feature, perhaps you would rather just disable Cortana. A Registry hack that will not remove Cortana is available here: postintrend uninstall Cortana on Windows 10.
Extract the files from Uninistall_Cortana.zip then run
Uninstall_Cortana.cmd as Administrator. It will take a
little time but once done Cortana will be gone.
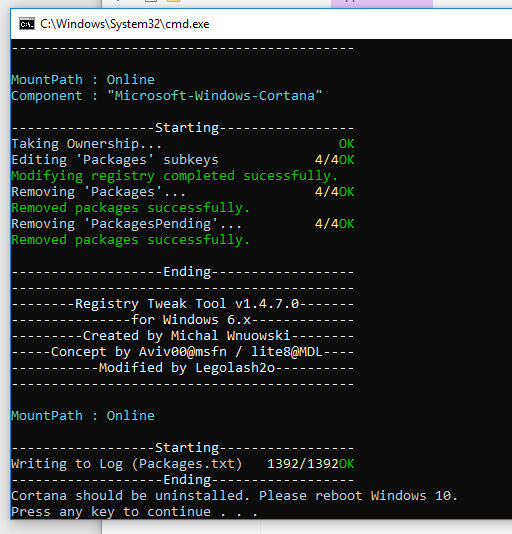
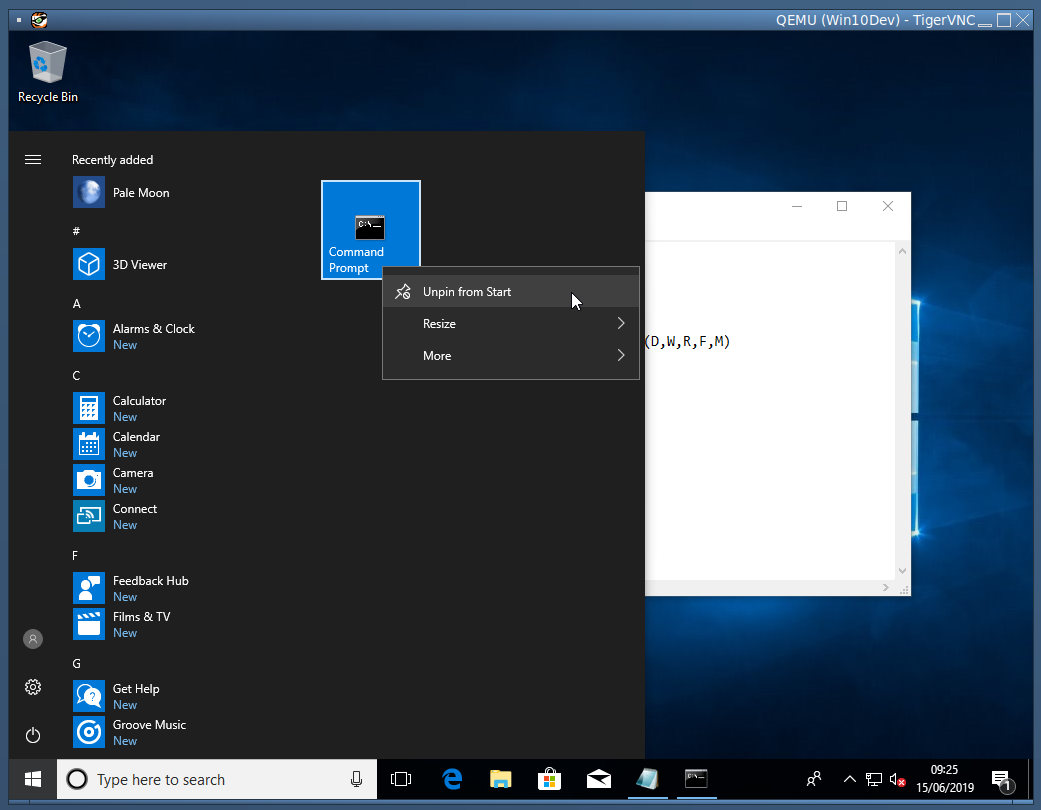
Type here to search does not work anymore and you may not type to find your programmes on the start menu. Also, all the tiles have been removed by right clicking and clicking unpin from start or uninstall if available.
Remove OneDrive
A simple command file in the Windows10Mods.zip package will remove the package and some DLLs... run as Administrator!
Hide 3D Objects Icon
The other simple script in the Windows10Mods.zip file will help with removing that annoying ICON
Remove Tiles
Right Click on all the tiles in the start menu and click "Unpin from Start" or "Uninstall" if available.