

Alpine Linux on Oracle Cloud
This information was mosty copied from Alex Tsang.
Create a new Instance
Creating a new instance on Oracle Cloud should create with it an internet accessible instance. Create the instance, download the generated private key (it is only going to be used temporarily) and then connect via SSH to the public IP address.
Screenshot
Unmount the boot partition and turn off swap
Since we are going to overwrite the start of the disk it is not desirable to have the current linux installation write to the boot partition for any reason as it will corrupt our installation.
Find out the name of the boot volume using lsblk or mount:
NAME   MAJ:MIN RM  SIZE RO TYPE MOUNTPOINT
sda      8:0    0 46.6G  0 disk
├─sda2   8:2    0    8G  0 part [SWAP]
├─sda3   8:3    0 38.4G  0 part /
└─sda1   8:1    0  200M  0 part /boot/efi
In the above example output from lsblk the boot volume is /dev/sda.
umount /boot/efi
swapoff -a
Write Installation Media
Download the Alpine Linux installation media with curl, wget or similar then write it raw to the boot volume.
curl -O 'http://dl-cdn.alpinelinux.org/alpine/v3.10/releases/x86_64/alpine-virt-3.13.5-x86_64.iso'
Write the iso to the boot volume:
dd if=alpine-virt-3.13.5-x86_64.iso of=/dev/sda
Once the image has been written, disconnect from the instance (close your SSH session).
[root@instance-20210601-2141 ~]# dd if=alpine-virt-3.13.5-x86_64.iso of=/dev/sda bs=8192
5248+0 records in
5248+0 records out
42991616 bytes (43 MB) copied, 0.0536698 s, 801 MB/s
[root@instance-20210601-2141 ~]#
Connect to the Serial Console
To perform installation it is possible to connect to the virtual instance serial console via SSH.
To connect to the console a 2 stage ssh command is required. In this example msys2 on Windows
or OpenSSH on Linux was used.
Open the Instance Details and select Console Connection from Resources on the left menu. Create the console connection and download the private key file (or provide a public key to oracle cloud).
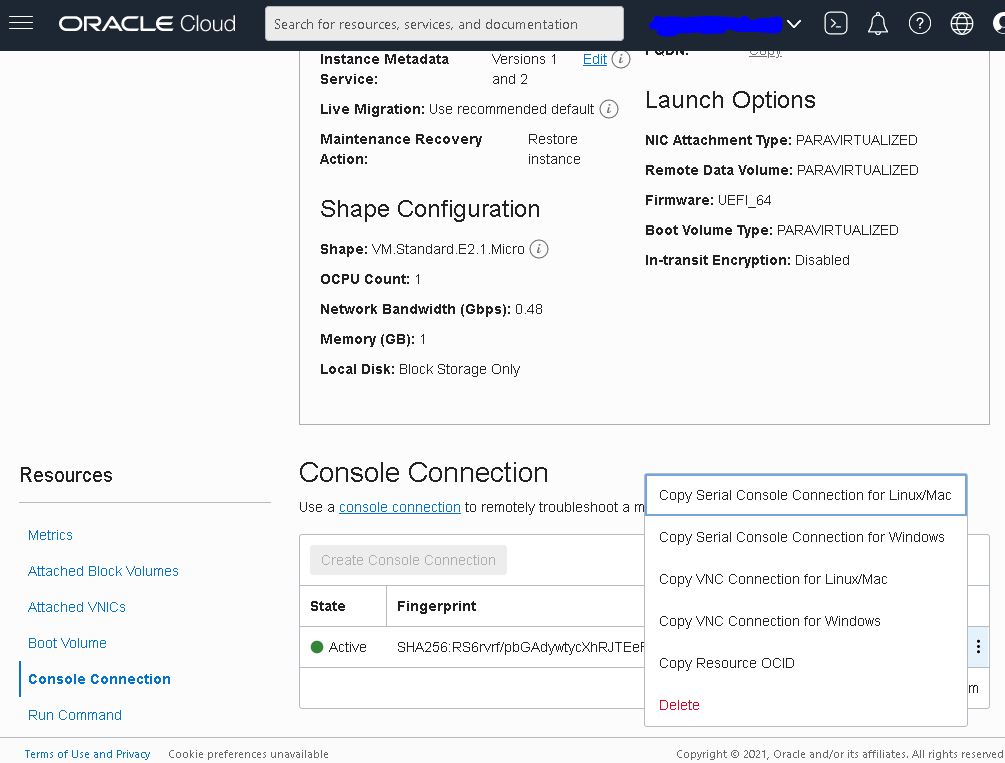
Once created, click the three dots and select "Copy Serial Console Connection for Linux/Mac".
The permissions on the key file should be altered so that only the user may read and write the file:
chmod og-rw ssh-key-2021-06-02.key
Paste into a text editor to make some minor changes:
ssh -i ssh-key-2021-06-02.key -o HostKeyAlgorithms=+ssh-rsa \
    -o PubkeyAcceptedAlgorithms=+ssh-rsa \
    -o ProxyCommand='ssh -i ssh-key-2021-06-02.key \
    -o HostKeyAlgorithms=+ssh-rsa \
    -o PubkeyAcceptedAlgorithms=+ssh-rsa \
    -W %h:%p -p 443 ocid1.instanceconsoleconnection.oc1.ap-tokyo-1.aaaaa@instance-console.ap-tokyo-1.oraclecloud.com' \
    ocid1.instance.oc1.ap-tokyo-1.bbbbb
Above I have added the -i switch followed by the filename of the private
key I downloaded from the website when I created the console connection.
It is also necessary to add some -o options to allow openssh to use
the older ssh-rsa algorithm (by default newer openssh does not support
ssh-rsa so we have to be explicit).
Once connected press enter to see the login prompt (as would be required if
connected to a real serial console):
=================================================
IMPORTANT: Use a console connection to troubleshoot a malfunctioni...

For more information about troubleshooting your instance using...
=================================================
The authenticity of host 'ocid1.instance.oc1... ()' can't be established.
RSA key fingerprint is SHA256:jJoBVyKZX4xy1vou7nO6CqvzKYwN//iE76MoQtrTmUs.
This key is not known by any other names
Are you sure you want to continue connecting (yes/no/[fingerprint])? yes
Warning: Permanently added 'ocid1.instance.oc1...' (RSA) to the list of known hosts.

Oracle Linux Server 7.9
Kernel 5.4.17-2102.201.3.el7uek.x86_64 on an x86_64

instance-20210601-2141 login:
Then, from the website click the Reboot button (it can be forced) alternatively type reboot into the ssh session connected earlier.
It should be possible to see Alpine Linux booting via the console connection.
Install Alpine
This part is a little boring but you could automate it. The steps to follow are in this file.
mkdir /media/setup
cp -a /media/sda/* /media/setup
mkdir /lib/setup
cp -a /.modloop/* /lib/setup
# Now everything is in RAM, unmount disks
/etc/init.d/modloop stop
umount /dev/sda
# Move the data so scripts can find it
mv /media/setup/* /media/sda/
mv /lib/setup/* /.modloop/

setup-keymap gb gb-extd
setup-hostname crazyhorse
rc-service hostname restart

killall udhcpc
setup-interfaces -a
rc-service networking start
rc-update add networking boot

echo -ne "W3lcomeHome55\nW3lcomeHome55" |passwd

setup-timezone -z Europe/London
setup-apkrepos -1

apk add grub-efi efibootmgr

export BOOT_SIZE=512
export SWAP_SIZE=1024
export ROOT_SIZE=10240
export BOOTLOADER=grub
export USE_EFI=1
When finished run setup-disk like below:
crazyhorse:~# setup-disk /dev/sda
The following disk is selected:
  sda   (50.0 GB ORACLE   BlockVolume     )
How would you like to use it? ('sys', 'data', 'lvm' or '?' for help) [?] sys
WARNING: The following disk(s) will be erased:
  sda   (50.0 GB ORACLE   BlockVolume     )
WARNING: Erase the above disk(s) and continue? (y/n) [n] y
Partition id "vfat" is not supported!
Creating file systems...
mkfs.fat 4.1 (2017-01-24)
Installing system on /dev/sda3:
Installing for x86_64-efi platform.
Installation finished. No error reported.
100% ████████████████████████████████████████████==> initramfs: creating /boot/initramfs-virt
Generating grub configuration file ...
Found linux image: /boot/vmlinuz-virt
Found initrd image: /boot/initramfs-virt
done

Installation is complete. Please reboot.
crazyhorse:~# reboot